
What Your Lease Actually Lets You Do
Lease rules, landlord requirements, and local building codes vary by property and location. Before painting, drilling, replacing hardwired fixtures, or changing anything connected to plumbing, check your lease and get written approval from your landlord or property manager. The guidance below is a general framework, not legal advice for your specific situation.
Before you order anything, read the section of your lease titled “alterations,” “modifications,” or “improvements.” Most standard leases distinguish between permanent alterations (which need written landlord consent) and reversible decor (which usually doesn’t). The line between the two is fuzzier than it sounds.
As a rough rule, anything that requires drilling new holes, removing original fixtures, or applying adhesive to a porous surface is treated as an alteration. Anything that sits on top of an existing surface, plugs into an outlet, uses existing holes, or hangs from damage-free strips is treated as decor.
Lower-risk updates renters can usually do without asking:
- Swapping cabinet knobs and pulls when the holes line up
- Replacing the faucet with the same connection size and hole count
- Installing peel-and-stick tile or removable wallpaper on smooth painted drywall
- Adding free-standing organizers, shelves, or sink skirts
- Damage-free Command-strip towel bars, rings, and cabinet organizers
- Rechargeable mirror lights and motion-sensor strip lights (no wiring)
- Replacing the vanity light fixture, with the original saved
Updates that usually need landlord sign-off:
- Painting cabinet doors, walls, or the vanity itself
- Removing the existing vanity, sink, or mirror
- Permanent tile installation, even small backsplashes
- Anything involving the plumbing rough-in or shutoff valves
- Hard-wired light fixtures in some states (California’s Title 24 is the strictest example)
If you’re not sure, get permission in writing. A two-line email saying “I’d like to swap the vanity light fixture for one I’ll pay for, and reinstall the original before move-out” almost always gets a yes, and you have a paper trail if anything comes up later.
How We Chose These 22 Updates?
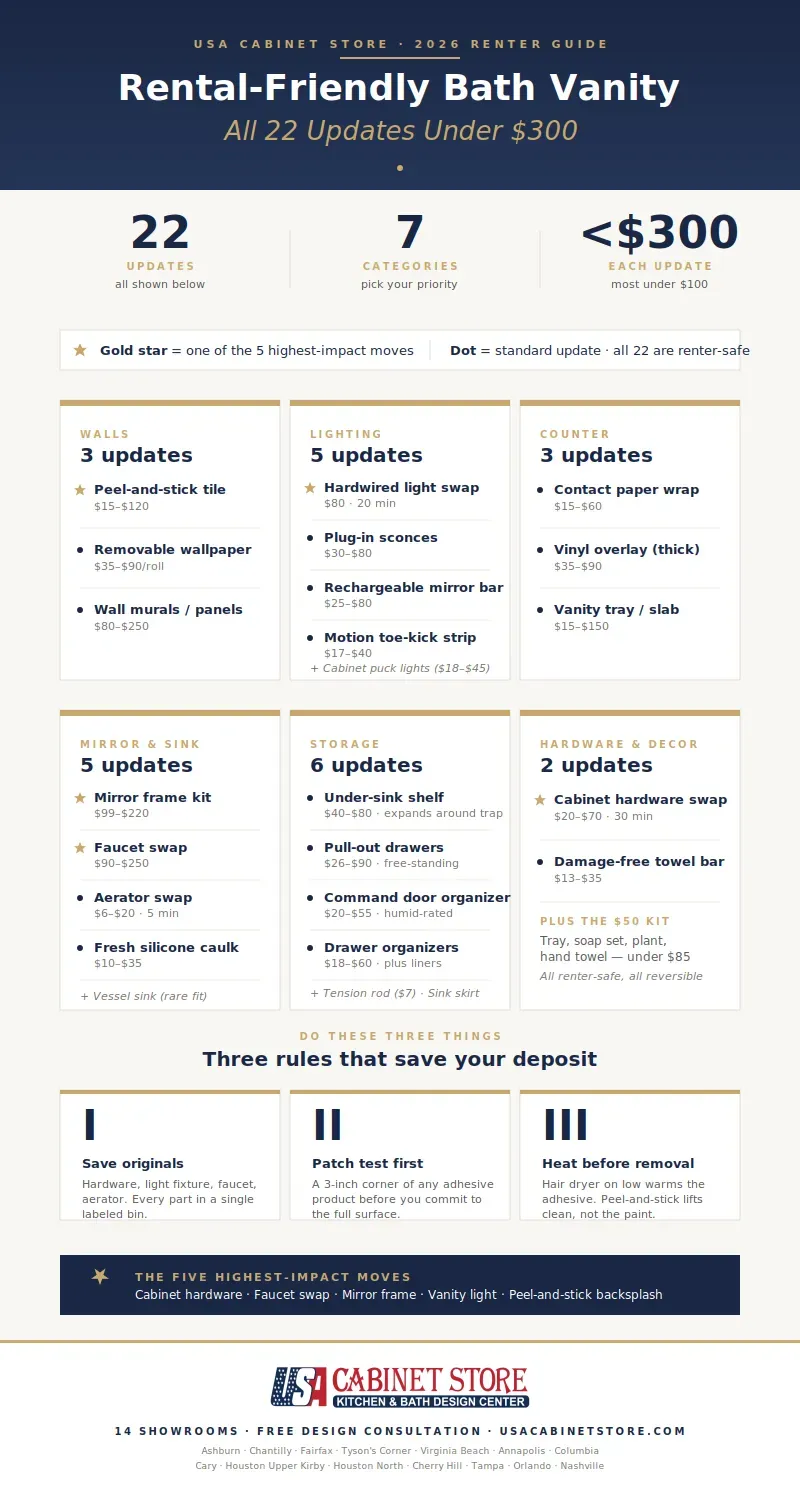
Every update in this guide had to clear three filters: it costs under $300, it can be installed without specialty trades, and it can be reversed cleanly at move-out without damaging the substrate. We cross-referenced product pages from the manufacturers cited throughout (Smart Tiles, d-c-fix, MirrorMate, Command, Tempaper, and others), pulled cost ranges from current Amazon, Home Depot, Wayfair, Target, and IKEA listings, and weighed visual-impact-per-dollar based on USA Cabinet Store’s design-consultation experience across 14 showrooms.
The five highest-impact moves at the top of the order-of-operations list are the ones our designers see make the biggest visual difference for the smallest investment, calibrated against real renter constraints (no demolition, no specialty trades, no landlord lockouts). The full 22 covers the long tail — including the niche cases like pedestal sinks, floating vanities, and bathrooms with no medicine cabinet — so the guide works regardless of what your rental gave you to start with.
Rental Bath Vanity Updates by Budget
Costs below are typical 2026 prices from Amazon, Home Depot, Wayfair, Target, and IKEA.
| Budget tier | What you can update | Visual impact |
| Under $20 | Faucet aerator, drawer mat, soap dispenser, one houseplant, fresh caulk tube | Low to medium |
| $20 to $50 | Cabinet knobs and pulls, damage-free towel bar, drawer organizers, cabinet puck lights, motion strip light, removable cabinet-door organizer | Medium |
| $50 to $150 | New vanity light fixture, rechargeable mirror light, contact paper countertop, peel-and-stick backsplash, faucet swap, under-sink expandable shelf, sink skirt | High |
| $150 to $300 | Mirror frame kit, full counter resurface, premium faucet, multiple peel-and-stick walls | Very high |
How to Make an Old Bathroom Vanity Look New Again?
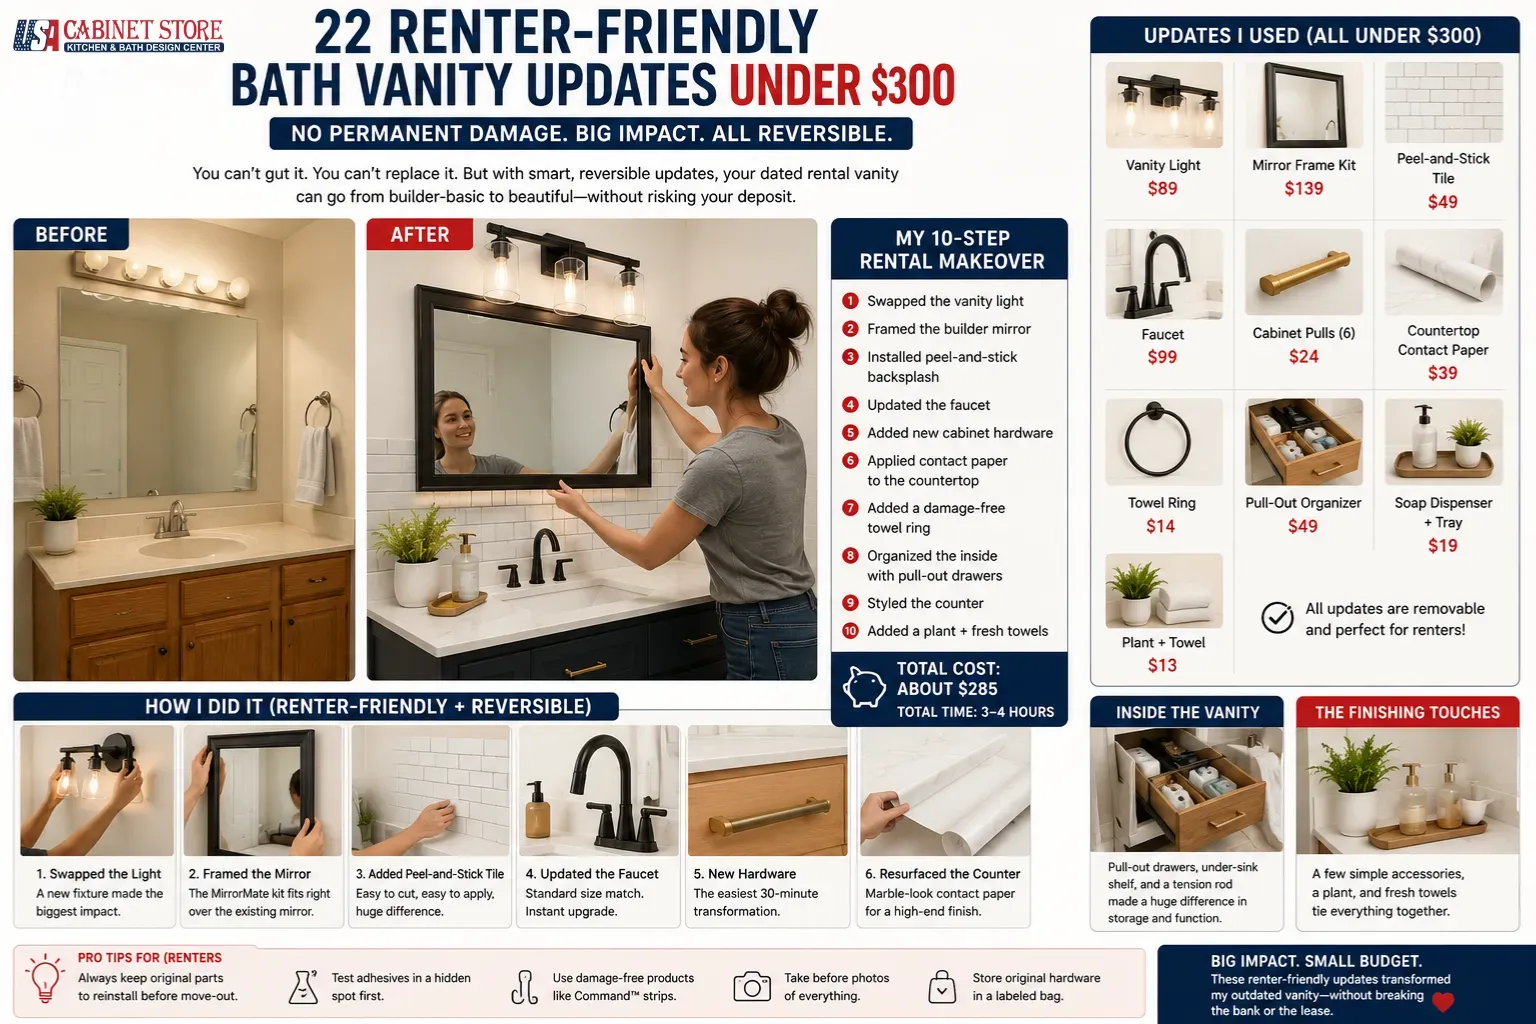
If you only do five things and you do them in this order, you’ll get most of the way to a magazine-grade rental bathroom on under $400 and a few hours of work for most beginners.
- Swap the cabinet hardware. Brushed brass or matte black pulls. 30 minutes, $30.
- Replace the faucet. Standard size match. 45 minutes, $100.
- Frame the mirror with a MirrorMate kit. 30 to 90 minutes, $150.
- Swap or supplement the vanity light. 20 minutes hardwired, or under 15 with a rechargeable mirror bar. $80.
- Add one piece of warm decor, like a leaning mirror, a snake plant, or a small wood tray. Under $30.
Five updates. A few hours of work. About $390 total. The vanity looks like a different fixture entirely. None of it touches anything permanent and all of it travels to the next rental.
Vanity Lighting: Hardwired, Plug-in, and Rechargeable Options
Lighting is the single highest-impact change you can make. A bad vanity light makes a perfectly fine bathroom look 20 years old, and a good one makes a basic vanity look intentional. There are three paths to better light: swap the hardwired fixture, plug in a sconce, or use a rechargeable bar. Pick based on how much wiring work you’re comfortable with.
Path 1: Hardwired fixture swap (20 to 60 minutes)
Most rental bathrooms have one of three setups: a flush-mount above the mirror, a vanity bar with two to four exposed bulbs, or a builder-grade dome from 2003. All three are hardwired to a junction box. Swapping the fixture means turning off the breaker, unscrewing two cap nuts, and unhooking three wires (black, white, ground).
The sequence (about 20 to 60 minutes depending on how cooperative the existing wiring is):
- Turn off the breaker for the bathroom circuit. Test with a non-contact voltage tester.
- Unscrew the decorative cap or finial holding the existing fixture.
- Lower the fixture. Three wire pairs are joined by cap nuts: black to black, white to white, ground to ground.
- Unscrew the cap nuts, separate the wires, set the original fixture aside in a labeled bin.
- Connect the new fixture’s wires to the matching colors. Replace the cap nuts and tug each one gently.
- Mount the new fixture using its bracket and screws.
- Turn the breaker back on. Done.
Save the original fixture, screws, and all hardware in a labeled bin. At move-out, take the new fixture and reinstall the original.
Path 2: Plug-in sconces and pendants
If you’d rather skip the wiring, plug-in wall sconces from Lutron, Casper, and similar brands use the GFCI outlet most bathrooms already have above the counter. Cord covers (Lutron makes paintable ones) hide the wire neatly. Plug-in puck lights stuck under the existing fixture also add brightness without touching anything permanent.
Path 3: Rechargeable mirror lights and motion strips (no wiring at all)
The fastest growing category since 2023. Three products to know:
- Rechargeable mirror light bar: magnetic or no-drill mounting, USB-C charged, adjustable color temperature. Sits above the mirror or on the frame itself. $25 to $80. Charges last roughly two weeks of daily use.
- Motion-sensor toe-kick strip light: stick-on rechargeable strip mounted under the vanity front rail or toe-kick. Turns on automatically at night. $17 to $40. Useful for floating vanities.
- Cabinet puck lights: battery-operated or rechargeable pucks for the inside top of the cabinet. Solve the dark back-corners problem. $18 to $45. Remote and timer features on most models.
All three are fully reversible. Mount them with the manufacturer-supplied adhesive in the manufacturer-stated way. Don’t substitute a stronger double-sided tape because you’re worried about hold; the bathroom’s humidity will let the supplied adhesive grip just fine, and a stronger tape risks pulling finish at move-out.
Best bulb temperature for a bathroom vanity
If you keep the original fixture but just want better light, the bulbs do most of the work. Aim for 3000K to 3500K, which is warm enough to look flattering in a mirror but cool enough to read makeup labels. Many people find 4000K and higher feels cooler and more clinical for a bathroom. The U.S. Department of Energy’s lighting facts label explains color temperature in plain terms.
Wall Surfaces Behind the Vanity
The wall behind the vanity is usually the largest visual block in the room, and it’s almost always painted in the cheapest off-white the property manager could buy. Three renter-safe ways to fix that.
Peel-and-stick tile
Modern peel-and-stick tile from Smart Tiles, Art3d, and Stick on Tile has improved enough that the difference from real ceramic is hard to spot from across the room. The good ones use a gel-coated surface for depth. Subway, hexagon, herringbone, and zellige patterns are all available.
Costs run about $7 to $12 per square foot. A typical 4-foot backsplash strip behind a vanity covers around 6 square feet, so plan on $45 to $75 for materials. Installation takes one to two hours.
One important caveat: Smart Tiles’ own product pages note that the adhesive becomes permanently affixed after about 48 hours once pressure is applied. The same pages also describe the tiles as removable with little to no damage, but treat installed-and-set tiles as partially reversible rather than peel-clean. For strict leases, get permission first or reserve it for a painted wall you’d be willing to touch up.
Removable wallpaper
Tempaper, Chasing Paper, Spoonflower, and Wallpops sell prepasted, water-activated rolls in patterns from clean grids to wild florals. A typical roll covers about 28 square feet and costs $40 to $80.
Bathroom-specific tip: stick with vinyl-based removable wallpaper rather than fabric-based. Vinyl tolerates moisture better and won’t peel at the corners after a hot shower.
Wall murals and stick-on panels
Removable murals from Murals Your Way and Wallpops cover an entire wall in one piece for $80 to $250. Stick-on PVC wall panels (the kind that mimic shiplap or board-and-batten) are another option, though removal can be trickier if the adhesive is strong.
Countertop Refresh: Three Renter-Friendly Options
Most rental bath counters are dated laminate or a thin cultured-marble basin. Both look better with the right cover, and neither needs to be removed.
Vinyl vanity wraps and contact paper
Marble-look contact paper from d-c-fix, Duck EasyLiner, and Fliestone holds up for two to four years on a bath counter as long as the surface stays mostly dry. The product pages all describe these as removable and best on smooth flat surfaces.
Apply on a clean, dry counter. Squeegee out bubbles as you go. Use a sharp utility knife to trim around the sink. A 4-foot vanity counter needs roughly $25 to $50 of material and takes about 90 minutes to install if it’s your first time. Removal is straightforward as long as the laminate underneath is sealed: warm with a hair dryer, peel slowly, and clean any residue with a mild adhesive remover.
Two things to know before you commit:
- Heat from hair tools (curling irons, flat irons) will lift the edges over time. A small heat-resistant mat fixes this.
- If the underlying counter is unsealed wood or chipped laminate, the adhesive can pull up flakes when you remove it. Test a hidden spot first.
Peel-and-stick countertop overlays
A step up from contact paper: EZ Faux Decor and Granite Coat sell thicker peel-and-stick overlays specifically rated for kitchen and bath surfaces. They cost $35 to $90 for enough to cover a small bath counter, hold up longer than contact paper, and look closer to real stone. Same install process, but the thicker material is more forgiving around the sink cutout.
Cover with a vanity tray or removable slab
Not every counter has to be reskinned. A long marble or wood vanity tray covers about a third of the surface and instantly upgrades the way the area reads. A removable cut-to-fit acrylic slab works for the unwilling: place a quartz or acrylic remnant over the existing counter, leave it loose, and lift it off when you move. Stone yards often sell remnants for $50 to $150.
Mirror Frame Kits: The Half-Hour Upgrade
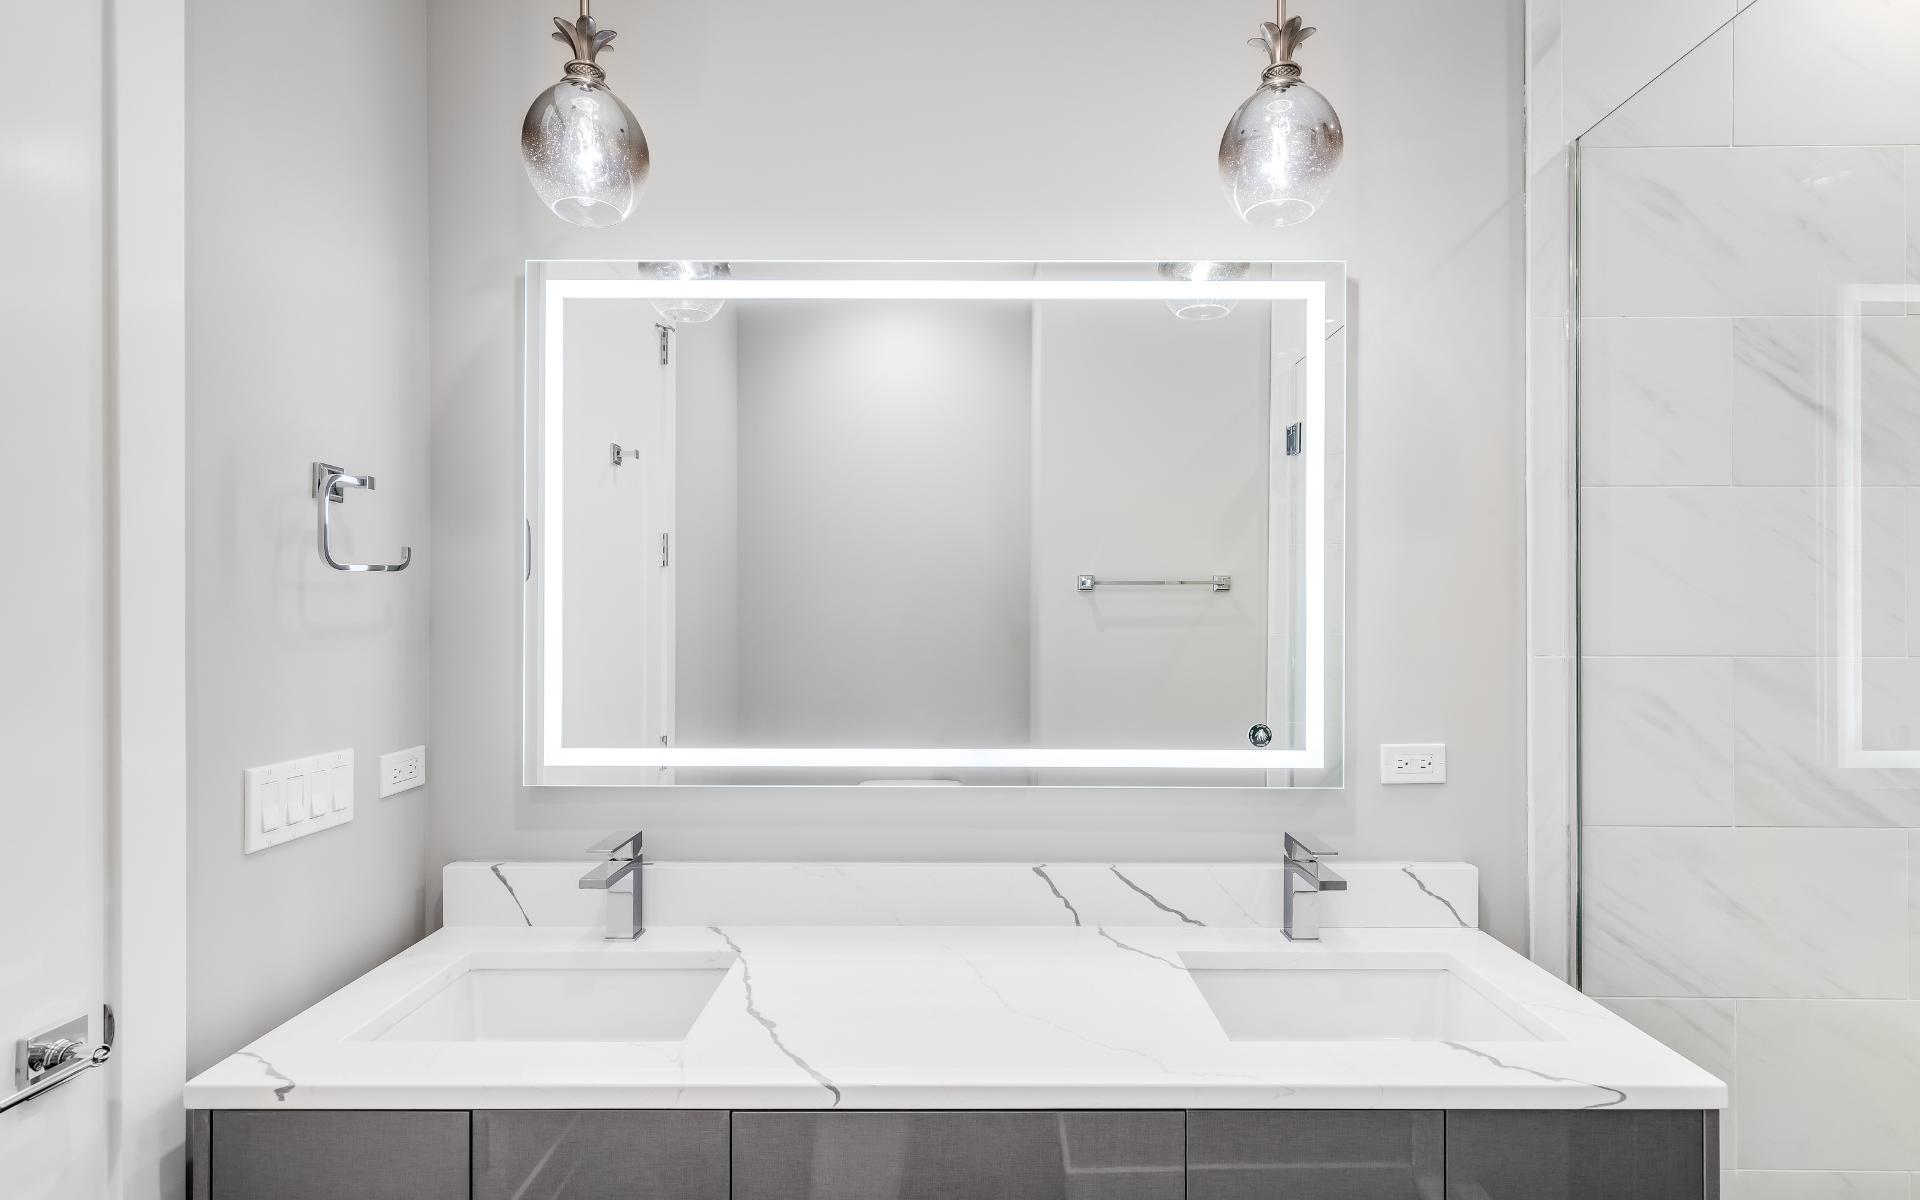
Builder-grade bathrooms almost always come with a plate-glass mirror screwed flat to the wall. You can’t remove it without risking damage, but you can frame it. MirrorMate sells custom-cut frames that adhere to the front face of the existing mirror with pre-installed tape, fit over mirror clips, and install in under 30 minutes. Frame styles run $99 to $220 depending on size and profile.
Worth knowing on removal: the official method is to use dental floss or fishing line to split the foam tape, then scrape residue from the mirror. The manufacturer warns that the frame may not be reusable without new tape, so treat the kit as a fixture for the duration of your lease rather than something you’ll move from rental to rental.
Sink Upgrades That Don’t Touch the Plumbing
Replacing the sink itself requires plumbing work and usually counts as an alteration. These three upgrades don’t.
Swap the faucet (most common, biggest impact)
If the existing faucet is a builder-grade chrome single-handle, replacing it is the single best return on $100 you can make in a rental bathroom. Most faucets use standard mountings (single-hole, 4-inch centerset, or 8-inch widespread) and standard supply line connections. Tools: a basin wrench, an adjustable wrench, and plumber’s tape.
Quick test before you order:
- Look under the sink. Count the supply lines (hot and cold) and the holes where the faucet handles come through the counter.
- Measure the distance between the outer hole centers. Under 4 inches means single-hole or 4-inch centerset. 8 inches or more means widespread.
- Buy the matching style. Delta, Moen, and Kohler all make solid mid-range faucets in the $90 to $150 range.
Photograph every connection before you start and save the original faucet and supply lines together in one box. When you move out, swap back and the property manager has no way to tell.
Faucet aerator swap (the $10 upgrade)
If you can’t replace the whole faucet, swap the aerator. A laminar-flow aerator from Neoperl or Niagara costs $6 to $20, screws onto the existing faucet spout, and changes the water stream from sputtery to spa-like. A WaterSense-labeled bathroom faucet or aerator can reduce sink water flow by 30 percent or more compared with standard 2.2 gpm fixtures.
One detail people miss: some modern faucets have hidden “cache” aerators that need a small key to remove. The key usually comes with the original faucet; if you don’t have it, a $3 universal key from the hardware store fits most brands. Keep the original aerator and the cache key in a small bag taped inside the vanity for the two-minute reversal at move-out.
Vessel sinks (rarely worth it for renters)
Vessel sinks sit on top of the counter rather than dropping in. If your rental has a flat counter with a drop-in sink, a vessel sink upgrade requires removing the existing sink, which crosses into alteration territory. Skip this one unless your setup already has a pre-cut single hole for a vessel.
Fresh silicone caulk along the sink
Re-caulking the sink and splash line isn’t a style upgrade, but it makes a grubby vanity look newly maintained. Cracked, yellowed, or moldy caulk is one of the first things landlords flag at inspection, and refreshing it can quietly help the deposit return.
Remove the old bead with a utility knife or caulk removal tool, dry the joint, run a thin continuous bead of waterproof mold-resistant bathroom silicone (DAP, GE, Loctite are the safe brands), and tool it immediately with a damp finger or caulk-finishing tool. Match the existing color (clear or white) so it doesn’t read as DIY. Allow 24 hours before running water near the joint. Materials cost $10 to $35; total time about an hour.
Storage and Organization Inside a Rental Vanity
Expandable under-sink shelf
Under-sink shelves that expand around the plumbing trap recover storage from the awkward pipe cut-out zone, which is otherwise dead space. Brands like SimpleHouseware, mDesign, and YouCopia make adjustable units in the $40 to $80 range that adjust width and height to fit around the trap.
Empty the cabinet, measure width, depth, and pipe location, assemble at the narrowest setting first, then adjust around the trap. Group items by height so tall bottles still fit. Add small bins on top for categories like cleaning, hair tools, and dental.
Free-standing pull-out drawers
Pull-out organizers make a deep vanity work like a shallow one by bringing the back half of the cabinet to you. For renters, the key is choosing free-standing or non-screw slide-out organizers rather than the permanently-mounted roll-out tracks that need to be drilled in. Light-duty sliding organizers from mDesign and iDesign run $26 to $90 and lift out cleanly at move-out.
Removable cabinet-door organizer
Command makes a bath cabinet organizer specifically designed for humid rooms and damage-free removal. It mounts to the inside of the vanity door with water-resistant adhesive strips and adds four to six small shelves for spare rolls, toothbrushes, and small bottles. About $20 to $55.
The removal protocol matters: pull the adhesive strip’s tab straight down slowly, not outwards. That’s the official method for Command’s bath-rated strips and it’s the difference between clean removal and pulled paint.
Drawer organizers and liners
If your vanity has drawers, internal organization is one of the best-value upgrades on this list. Compact organizers from mDesign and iDesign cost $14 to $32; drawer mats are nearly free. Cut the liner fractionally short of the drawer perimeter so it lifts out cleanly later. Group by category: everyday grooming, first aid, dental, cosmetics, spares.
Tension rod under-sink hack
A tension rod across the back of the under-sink cabinet, about 8 inches above the floor, gives you a place to hang spray bottles by the trigger. Frees up the floor for everything else. Total cost: about $7.
Damage-free towel bar or ring
A hand-towel bar or ring on the vanity side panel or the wall next to the sink is small but it makes the area feel deliberate. Command’s bathroom-rated adhesive towel bars and rings run $13 to $35 and remove cleanly. Mount on a finished side panel, tile, or mirror-adjacent surface rather than on fragile paint.
Sink skirt for pedestal or open vanities
If your rental has a pedestal sink or a wall-hung basin with no cabinet underneath, a sink skirt is one of the most renter-sensible ways to add softness and hide storage or plumbing. Ready-made skirts run about $25; custom linen options from Etsy sellers reach $100 or more.
Most attach with hook-and-loop tape or a discreet tension rod. Measure the visible front width and the drop you want, clean the surface where the tape will sit, fix the mating tape, hang the skirt, and check for plumbing access. Time: 30 to 90 minutes with a pre-made skirt.
Hardware: The 30-Minute Upgrade
Cabinet pulls and knobs are the cheapest visible upgrade in any rental bathroom. A set of six matching pulls from Anthropologie, World Market, IKEA, or Amazon costs $20 to $60. They take 30 minutes to install, and the original holes work for most modern replacements.
Three things to check before you buy:
- Center-to-center measurement on the existing pulls (3 inches and 3.75 inches are most common in builder cabinets)
- Finish: brushed brass, matte black, antique copper, brushed nickel
- Knob diameter if you’re switching from pulls to knobs (you’ll only use one of the two existing holes)
The same logic applies to toilet paper holders, towel bars, robe hooks, and the bathroom door handle. None require structural changes. All make the room feel less like a rental.
How to Paint a Rental Bathroom Vanity on a Budget?
Painting is the upgrade renters ask about most often and the one most leases specifically restrict. The short answer: paint changes the vanity more than any other update on this list, but you have to do it with permission and you have to do it right. Doing it wrong is one of the fastest ways to lose a deposit.
If you’d rather skip the permission gamble, peel-and-stick vinyl cabinet wraps give you most of the visual change with none of the lease risk. Both paths are covered below.
Step 1: Ask permission the right way
Most landlords say yes to neutral colors (white, light gray, soft black) if you bring it up the right way. The script:
“I’d like to paint the vanity cabinet in [neutral color name] at my own expense. I’ll use cabinet-grade primer and paint, and I’ll repaint it back to the original color before move-out if you prefer. Can I have written permission to proceed?”
Get the answer in writing. Most landlords accept this because neutral colors don’t hurt rentability, you’re paying, and you’ve already committed to reverting if asked.
Step 2: Pick the right paint and primer
Vanity cabinets in rentals are almost always one of three surfaces: laminate, melamine, or sealed MDF. Standard wall paint won’t stick to any of them. You need a bonding primer first.
The short list for cabinet painting:
- Primer: INSL-X Stix or Zinsser Bullseye 1-2-3. Both bond to laminate and melamine without sanding. One quart costs $20 to $25.
- Paint: Benjamin Moore Advance, Behr Cabinet & Trim Enamel, or Sherwin-Williams Emerald Urethane Trim Enamel. All three self-level, cure hard, and tolerate bathroom humidity. One quart runs $30 to $50.
- Brush and foam roller combo: $15 for a small angled brush and two 4-inch foam rollers.
- Total cost: $65 to $90 for a complete vanity paint job.
Step 3: The 4-hour painting process
Light sanding, clean, prime, two coats:
- Remove the doors and drawer fronts. Set hardware aside in a labeled bag.
- Wipe everything down with a degreaser like TSP substitute. Let dry.
- Lightly scuff-sand all surfaces with 220-grit sandpaper. You’re giving the primer something to grip, not removing the finish.
- Wipe again to remove dust. Apply one coat of bonding primer. Let cure overnight.
- Apply two thin coats of cabinet paint, sanding lightly with 320-grit between coats.
- Let cure for 48 to 72 hours before reattaching doors and hardware.
If permission is denied: peel-and-stick vinyl cabinet wraps
d-c-fix, Velinda, and Renters Solutions sell adhesive vinyl sheets specifically for cabinet doors. They install in about an hour per vanity, run $30 to $60 for enough material, and peel off cleanly with a hair dryer at move-out. Test a small piece on the back of a door first to confirm the adhesive doesn’t pull anything off.
One trade-off worth knowing: vinyl wraps last two to three years in a humid bathroom. If you plan to be in the rental longer, paint with permission is the better investment.
Accessorizing Your Rental Bath Vanity on a Budget
Once the fixed elements look intentional (hardware, light, mirror, counter), the soft layer carries the rest. Under $50 buys most of what you need to make a basic vanity look styled.
The under-$50 accessory kit
- Tray for the counter (ceramic, marble, or wood) — about $15 to $25
- Matching soap dispenser, lotion bottle, and toothbrush holder set — $20 to $30
- One real plant (pothos, snake plant, or ZZ plant — all three tolerate humid bathrooms) — $10 to $15
- A fresh hand towel in a color that relates to something else in the room — $8 to $15
Style cohesion rules
Three rules separate “random stuff on the counter” from “intentional styling”:
- Group accessories in odd numbers (one, three, or five). Even numbers look accidental; odd numbers look composed.
- Match metal finishes. Pick one (brushed brass, matte black, polished nickel) and use only that finish across hardware, faucet, light fixture, and accessory hardware.
- Keep daily-use items off the counter unless they’re attractive. Toothbrushes belong in a holder, hair tools in a drawer.
What not to buy
- Decorative-only items that don’t serve a purpose. They become clutter within a month.
- Cheap chrome accessories. They tarnish and look dated faster than any other finish.
- Any “matching set” with tissue box cover, toilet brush, and waste basket. Sets read as a kit; mixed pieces read as styled.
Best Budget-Friendly Bathroom Vanity Styles in 2026
Style is half the reason a rental bathroom feels dated. The wrong style ages a space by 15 years in a single decade. Six styles look intentional in 2026 across price points; three styles read “stuck in time.” Useful both as renter inspiration (this is what to mimic with paint and hardware) and as landlord guidance (this is what to buy).
Six styles that look intentional in 2026
- White Shaker. Five-piece flat-panel doors, brushed brass or matte black pulls, white quartz or marble-look counter. The eternal default. Renter version: paint existing doors white, swap to brass pulls. Installed: $400 to $1,400.
- Natural-wood Shaker. Light oak or walnut Shaker doors paired with white quartz. Currently surging in 2026 new construction. Renter version: peel-and-stick wood-grain vinyl wrap. Installed: $600 to $1,800.
- Modern minimalist slab. Flat slab doors in matte white, charcoal, or sage. Push-to-open hardware or thin recessed pulls. Floating mount where the bathroom allows. Installed: $700 to $2,200. Hard to mimic in a rental because slab doors are the main signal.
- Mid-century. Tapered legs, walnut or teak fronts, small round knobs. Works best in older buildings with character. Installed: $500 to $1,500. Renter version: existing brown vanity plus walnut wrap plus round knobs gets you 70% there.
- Black metal frame with wood top, exposed plumbing under, vessel sink. Niche but specific. Installed: $400 to $1,200.
- Coastal cottage. Beadboard side panels, light blue or sage door fronts, white quartz, polished nickel hardware. Right for older homes near water. Installed: $500 to $1,500.
Three styles to avoid in 2026
- Espresso brown. Dominant in mid-2010s builder grade. Reads dated immediately in any setting newer than 2015.
- Glossy white melamine. Common in low-tier rentals. Scratches show fast, yellow patches develop near the sink, and the gloss reads cheap rather than modern. A satin or matte finish always ages better.
- Hollywood-style vanity light with exposed round bulbs. The strip of bare bulbs across the top of the mirror is the single most aging element in a 1990s rental bathroom
Best Materials for a Budget Vanity Update (By Use Case)
Material choice is the difference between an update that lasts three years and one that bubbles at the corners in three months. The right material depends on what surface you’re covering and how much moisture it sees.
| Use case | Best material | Cost | Lifespan |
| Counter resurface (low moisture) | Marble-look contact paper (d-c-fix) | $15 to $60 | 2 to 3 years |
| Counter resurface (high moisture) | Thick vinyl overlay (EZ Faux Decor) | $35 to $90 | 3 to 4 years |
| Backsplash tile | Gel peel-and-stick (Smart Tiles) | $15 to $120 | 3 to 5 years |
| Cabinet doors (painted) | Cabinet paint plus bonding primer | $65 to $90 | 5+ years |
| Cabinet doors (no permission) | Vinyl cabinet wrap (d-c-fix) | $30 to $90 | 2 to 3 years |
| Wall covering | Vinyl removable wallpaper | $35 to $90/roll | 3 to 5 years |
| Mirror frame | MirrorMate adhesive frame | $99 to $220 | Indefinite |
| Hardware | Solid zinc or solid brass pulls | $20 to $60/set | Reusable |
Two patterns to know. First, vinyl rated for kitchens and bathrooms outlasts generic contact paper by years. Read the product page. If it doesn’t specifically say bathroom or kitchen, it isn’t the one. Second, gel-coated peel-and-stick tile outlasts flat vinyl peel-and-stick by 2x in a moist bathroom. The gel coat is what gives the tile its dimensional look and its moisture seal.
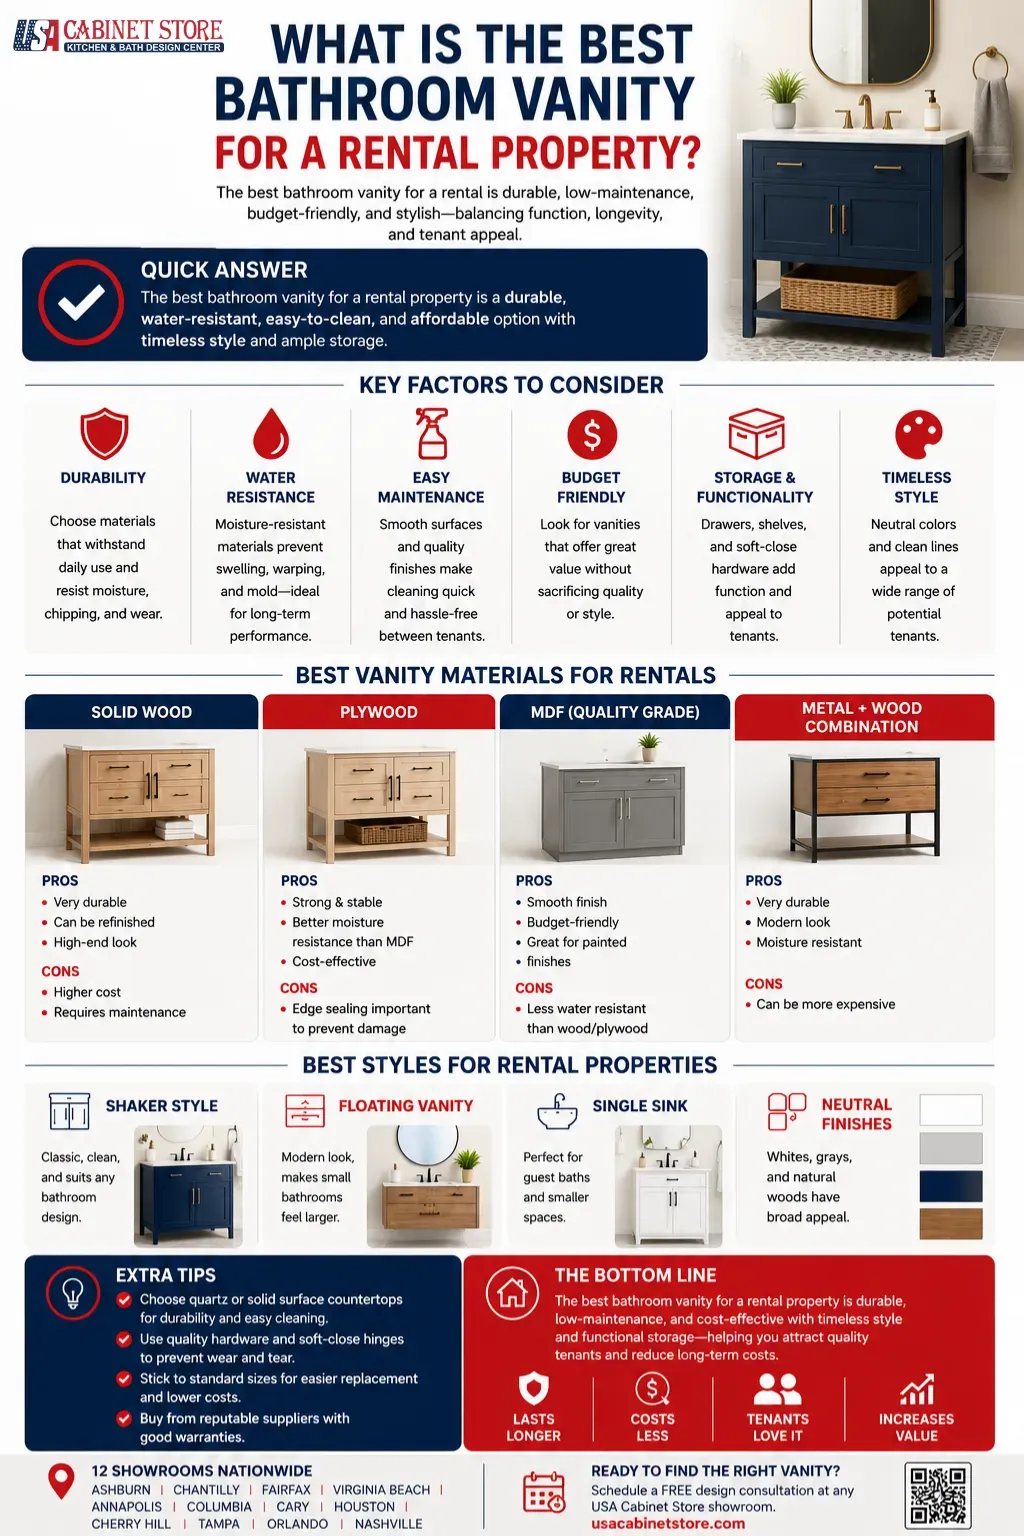
For Landlords: Choosing Bath Vanities for Rental Properties
If you’re on the other side of this equation, picking vanities for rental units, the calculus is different. Tenants change. The vanity stays. Three things matter more than aesthetics.
Material durability
Solid wood and plywood vanities outlast MDF in a high-humidity, high-turnover setting. The cost difference is real (plywood-box vanities run $200 to $400 more than MDF equivalents in the same size), but the lifespan difference is also real. Plywood holds up to water exposure under the sink, where MDF swells and fails. For a unit you plan to hold for ten years or more, plywood pays for itself.
Size and configuration
Standard rental sizes run 24, 30, 36, and 48 inches wide. For most one-bedroom units, a 30-inch single-sink vanity covers the practical need. Two-bedroom units serving couples benefit from a 48-inch double-sink configuration if the bathroom can fit one. Floating vanities look modern but make floor cleaning harder and date faster, which matters in long-hold rentals.
Finish and color choices that age well
White Shaker and natural wood-tone Shaker outlast every trend cycle. Espresso brown, popular through the 2010s, now reads dated. Glossy white melamine, common in lower-tier rentals, scratches and yellows. Stick to matte or satin finishes, neutral colors, and traditional door profiles.
The NKBA Bathroom Planning Guidelines cover clearance, accessibility, and storage standards. Properties built to those standards lease faster and stay leased.
10 Common Mistakes Renters Make Updating a Bath Vanity
Every fix in this guide is reversible if done right. Most of the deposit-loss horror stories online come from a small number of repeated mistakes. Renters routinely post on subreddits like r/fixit and r/Renters about losing deposits after peel-and-stick removal pulled paint or drywall paper off the wall. None of these mistakes are hard to avoid once you know what to watch for.
- Applying peel-and-stick over flaking paint.
This is the single biggest cause of deposit loss in the rental DIY space. If the underlying paint is already flaking, the peel-and-stick adhesive will be stronger than the paint, and removing the product takes the paint off in sheets. Test a 3-inch by 3-inch corner first. If the paint comes off with the test piece, repaint the wall first (with permission) or skip peel-and-stick on that wall.
- Not asking permission for things that need permission.
Painting cabinet doors, drilling into tile, and altering the plumbing rough-in all need written landlord approval. “I didn’t know” is not a legal defense in a deposit dispute. Get permission in writing for anything beyond simple decor.
- Tossing the original hardware in the trash.
Original cabinet knobs, original light fixture, original faucet, original supply lines. Every original part must be stored in a labeled bin in a closet. Without them, you can’t restore the bathroom at move-out and the landlord can charge replacement cost.
- Buying just enough peel-and-stick tile.
Always order 10 to 15 percent more than your square footage. You will mis-cut. You may need a replacement tile months later when one corner lifts. Same-batch backup tiles cost five dollars and save the whole project.
- Eyeballing the first row.
Crooked first row equals crooked everything. Use a level and a pencil to mark a horizontal guide line on the wall before peeling a single backing. Dry-lay two rows on the floor first to confirm the pattern alignment works.
- Putting hair tools directly on a contact-paper counter.
Curling irons, flat irons, and blow dryers permanently scorch peel-and-stick countertop overlays. A small heat-resistant mat costs three dollars and prevents the most common pre-move-out emergency.
- Painting the vanity without bonding primer.
Standard wall paint peels off laminate and melamine in patches within months. INSL-X Stix or Zinsser Bullseye 1-2-3 is non-optional on laminate or melamine surfaces.
- Yanking peel-and-stick off cold.
Without heat, the adhesive often won’t release cleanly. Either the product tears or it pulls drywall paper with it. Always use a hair dryer on low, work slowly from one corner, and pull at a 45-degree angle. Five extra minutes saves the wall.
- Using residential-grade vinyl wrap in a high-moisture bathroom.
Generic contact paper not rated for moisture will bubble within weeks. Look for vinyl rated for kitchens and bathrooms specifically. d-c-fix, Smart Tiles, and EZ Faux Decor all label their bathroom-rated lines clearly.
- Forgetting to document the original state.
Before you do anything, photograph every surface. Wide shots, close-ups of any pre-existing scratches, dents, or stains. Time-stamped photos in a cloud folder are the single best protection in a deposit dispute. Takes 10 minutes and has settled hundreds of deposit fights.
When You Move Out: Restoring the Vanity Area
Every renter-friendly update in this guide is reversible. The key is doing the reversal properly so you get your deposit back. A short checklist:
- Remove peel-and-stick tile and wallpaper with a hair dryer, slowly, working from one corner
- Lift contact paper and adhesive overlays the same way; use Goo Gone for residue
- Pull Command and damage-free adhesive strip tabs straight down slowly, not outwards
- Swap original cabinet hardware back in, using the original holes
- Reinstall the original vanity light fixture (this is why you saved the box)
- Reattach the original faucet and supply lines
- Reinstall the original aerator using the cache key if needed
- Patch any unused nail holes with spackle, sand smooth, touch up with the rental’s original paint
- Take the new fixtures with you. They work in the next place.
Done properly, the bathroom should look identical to the day you moved in. A standard rental walkthrough won’t flag any of it.
When You’re Ready to Buy: Real Vanity Options
Most renters move into ownership eventually. When you do, the rules change. You can pick the vanity, the counter material, the lighting, and the layout. Custom and semi-custom vanities run $1,200 to $5,000 installed depending on size and finish, but they last 15 to 25 years and add resale value the moment they go in.
USA Cabinet Store carries a wide selection of bathroom vanities across 12 showrooms (Ashburn, Chantilly, Fairfax, Virginia Beach, Annapolis, Columbia, Cary, Houston, Cherry Hill, Tampa, Orlando, and Nashville), with design consultations included. If you’re a few months from buying, it’s worth walking a showroom to see what real options look like in person. Most carry the Shaker and shaker-inspired styles that work in the homes you’re likely to be looking at.
Frequently Asked Questions for 22 Rental Friendly Bath Vanities Under $300
How can I paint my bathroom vanity on a budget in a rental?
Painting a rental vanity costs $65 to $90 total and requires written landlord permission, the right bonding primer (INSL-X Stix or Zinsser Bullseye 1-2-3), and a cabinet-grade paint (Benjamin Moore Advance, Behr Cabinet & Trim Enamel, or Sherwin-Williams Emerald Urethane). Lightly sand with 220-grit, apply one coat of bonding primer, then two thin coats of cabinet paint. Let cure 48 to 72 hours before reattaching doors. If permission is denied, peel-and-stick vinyl cabinet wraps from d-c-fix give a similar painted look for $30 to $60 with no lease risk.
What are the best budget-friendly bathroom vanity styles in 2026?
Six styles look intentional: white Shaker, natural-wood Shaker, modern minimalist slab, mid-century, industrial, and coastal cottage. Three styles to avoid because they read dated: espresso brown, glossy white melamine, and Hollywood-style vanity lights with exposed round bulbs. Renter cost: $50 to $200 in vinyl wraps and hardware. Homeowner installed cost: $400 to $2,200 depending on style and size.
What are the most common mistakes when updating a bathroom vanity on a budget?
Ten mistakes account for most deposit-loss horror stories: applying peel-and-stick over flaking paint, skipping written landlord permission, throwing away original hardware, buying just enough tile without backup, eyeballing the first row, putting hair tools directly on contact-paper counters, painting without bonding primer, removing peel-and-stick cold without heat, using non-bathroom-rated vinyl in a humid bathroom, and forgetting to photograph the original state before starting any work.
What materials are best for a budget bathroom vanity update?
Match the material to the surface and moisture level. Counter resurface: marble-look contact paper (d-c-fix, $15 to $60) or thick vinyl overlay (EZ Faux Decor, $35 to $90). Backsplash: gel peel-and-stick tile (Smart Tiles, $15 to $120). Cabinet doors: cabinet paint with bonding primer ($65 to $90 total) or peel-and-stick vinyl wrap ($30 to $90). Walls: vinyl-based removable wallpaper ($35 to $90 per roll). Always pick products specifically rated for kitchens and bathrooms.
Are there affordable options for replacing bathroom vanity countertops?
For renters, no. Replacing the counter is an alteration in most leases. Use contact paper or vinyl overlay instead ($15 to $90 total). For homeowners: stone remnants from a local stone yard ($50 to $200), pre-fab vanity tops with integrated sinks from Home Depot or Lowe’s ($150 to $400), new quartz or granite cut to size ($400 to $1,200), or full vanity-and-counter packages from cabinet retailers ($800 to $3,500 installed).
How can I make an old bathroom vanity look new again?
Five updates get you most of the way on under $400 and two hours of work: swap the cabinet hardware ($30), replace the faucet ($100), frame the mirror with a MirrorMate kit ($150), swap the vanity light fixture ($80), and add one piece of warm decor ($30). None of it touches anything permanent and all of it travels to the next rental.
What are some DIY projects for updating a bathroom vanity?
Under 30 minutes: swap knobs and pulls, replace the faucet aerator, frame the mirror, add a tray and a plant, mount a rechargeable mirror light. 30 minutes to 2 hours: replace the vanity light, swap the faucet, install pull-out organizers, hang plug-in sconces, install puck lights inside the cabinet. Half a day: install peel-and-stick tile, apply contact paper, hang removable wallpaper, apply vinyl cabinet wrap, refresh the caulk line. A weekend: paint the cabinet with bonding primer and cabinet paint (with permission).
How can I add storage to my bathroom vanity without spending much?
Five fixes covering most rental vanities: expandable under-sink shelf that adjusts around the plumbing trap ($40 to $80), free-standing pull-out drawer organizers ($26 to $90), Command bath-rated cabinet door organizer ($20 to $55), drawer organizers and liners ($18 to $60), and a $7 tension rod across the back of the under-sink cabinet for hanging spray bottles by the trigger.
How can I accessorize my bathroom vanity on a budget?
Under $85 buys the full kit: a tray for the counter ($15 to $25), a matching soap and lotion and toothbrush set ($20 to $30), one real plant ($10 to $15), and a fresh hand towel in a color that relates to something else in the room ($8 to $15). Three styling rules: group accessories in odd numbers, match metal finishes, and keep daily-use items off the counter unless they’re attractive.
Can renters legally replace a bathroom vanity light?
In most states, yes, as long as you save the original fixture and reinstall it before move-out. A handful of states (California’s Title 24 is the strictest example) require licensed electrical work for permanent changes. Hardwired light fixture swaps are usually considered routine maintenance rather than permanent alterations, but read your lease’s electrical clause to be safe.
How do I cover ugly bathroom countertops in a rental?
Marble-look contact paper or peel-and-stick countertop overlays. d-c-fix and EZ Faux Decor sell rolls and sheets that adhere to existing laminate, hold up for two to four years, and peel off cleanly when you move. Budget around $15 to $90 depending on material thickness. Use a heat-resistant mat under hair tools to prevent the most common pre-move-out emergency.
What bulb temperature is best for a bathroom vanity?
3000K to 3500K, warm enough for flattering mirror light but bright enough for accurate makeup and grooming. Higher color temperatures (4000K and up) start to feel clinical. Pair with a 90+ CRI bulb for accurate color rendering.
How long do peel-and-stick bathroom updates last?
On walls (tile, wallpaper): three to five years if kept reasonably dry. On counters (contact paper, overlays): two to four years, less if exposed to hair-tool heat. On cabinet doors (vinyl wrap): two to three years. Note that Smart Tiles peel-and-stick backsplash becomes permanently affixed after about 48 hours per the manufacturer; removal is still possible but treat it as partially reversible rather than peel-clean.
Do peel-and-stick products damage rental walls?
Properly applied and properly removed, no. The two main causes of damage: applying over flaking paint (the paint comes off with the product), and yanking the product off cold without heat (which can pull off the paper face of the drywall). Use a hair dryer on low, work slowly from one corner, and test a small spot first.
The Bottom Line
Rental bathrooms are constrained, not hopeless. The 22 updates covered here, taken together, cost less than \$500 and visually transform a dated builder bathroom into something that looks intentional. The order of operations, ranked by visual impact per dollar:
- Cabinet hardware ($20 to $70, 30 minutes)
- Vanity light fixture or rechargeable mirror bar ($25 to $150, 15 to 20 minutes)
- Faucet swap ($90 to $250, 45 minutes)
- Mirror frame from MirrorMate ($99 to $220, 30 to 90 minutes)
- Peel-and-stick backsplash ($15 to $120, 1 to 3 hours)
- Counter contact paper or overlay ($15 to $90, 1 to 3 hours)
- Under-sink expandable shelf and free-standing pull-outs ($26 to $90, 15 to 45 minutes)
- Damage-free towel bar and cabinet-door organizer (under $90, 15 to 45 minutes)
- Aerator swap and caulk refresh (under $50, under 2 hours combined)
- Accessories: tray, plant, hand towels, matched soap set (under $85)
Save every original part you remove. Reinstall everything before you hand back the keys. Your deposit stays yours. When you eventually buy a place and can do the real version, you’ll already know what you actually want in a bathroom.
Ready to plan the real thing?
Schedule a free design consultation at any USA Cabinet Store showroom.